- NEW DVD Series – Stone Setting with Bezels
- Tube Set Charm by Kim St. Jean
- Prong Basket Pendant by Kim St. Jean
- NEW DVD Series – Stone Setting with Cold Connections
- New DVD Series – Stone Setting with Wire
- NEW DVD Series: Introduction to Stone Setting by Kim St. Jean
- Featured Tool: Bracelet Bending Plier
- NEW Dvd by Eva Sherman
- Fun, Fast Fold Forming DVD Series
- Double Band Ear Cuff from Alex Simkin
The Center Punch and Scribe
by Judy Ellis, Wirejewelry.com
Wire Jewelry Tool Tip for December 14th 2016
Get to know your hand tools – Tool Tip Two
The Center punch and Scribe
Today, we continue with our 12 part tool tip series by Helen Driggs. In today’s tip Helen gives us some good advice on using the center punch and scribe, and the difference between the two.
A little about Helen:
HELEN I. DRIGGS is an experienced metalsmith, lapidary and studio jewelry instructor and has appeared in 6 instructional jewelry technique videos. Her book, The Jewelry Maker’s Field Guide was published in 2013.
Follow her blog: materialsmithing.wordpress.com, Instagram: hdriggs_fabricationista and Twitter feed @fabricationista for news, her teaching schedule and for other jewelry-related information.
Helen Says:
The Center punch and Scribe may look the same, but don’t make the mistake of mixing them up! To tell them apart, you’ll notice the scribe is very sharp on one or both ends. The center punch is pointed on one end and flat on the other. Both of these tools are tried and true essentials for all types of metalwork.
Of the two tools, you will probably use the center punch almost-always — if you intend to create openings the professional way by drilling holes instead of punching them. Whenever you need to drill a hole, you’ve got to have a center punch to start the hole.
The scribe is a layout and marking tool and is used for making clear lines on metal sheet to indicate cuts, folds, or other layout lines. Small corks or a small chunk of eraser on each tip are both great ways to protect those sharp points.
Choosing a center punch:
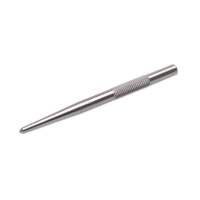
There are several sizes and shapes of center punch on the market. I like the tapered version with a textured shank. Look for a hardened steel model, and purchase several – I leave one near the drill press, another on my bench top and a third in my travel tool box. There are also automatic center punches on the market that work with a spring loaded shaft – simply push down and the punch tip sharply strikes the metal and creates a divot immediately. No hammer required! Expect to spend anywhere from $4.00 and up for a manual punch and up to $30.00 for a well made automatic punch.
Some examples:

Choosing a scribe:
I like a very sharp scribe with two sharpened tips and a textured shank. Again, carbide or hardened steel is a must. Expect to spend $10.00 or more for a well made scribe, and never forget to protect those tips.
A few examples:
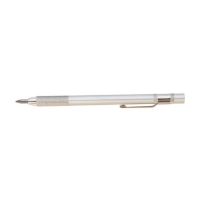
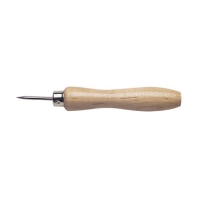
How to use the center punch:
The idea of the center punch is to make a small dimple or divot in sheet metal for positioning something. For drilling, it is used to mark the center position for the drill bit, and that divot creates a place where the rotating drill can remain steady to allow the bit to shave a sliver of metal (called swarf) out of the hole. When you position the center punch on the metal sheet, make sure you’ve got a steel block under the metal to keep it flat. After carefully positioning the punch, lightly tap it with a ball peen or chasing hammer – you don’t need to go through the sheet, you just need to create a shallow divot. Then, move the metal to a wood block and slowly drill the hole. Drill saving tip: go as slowly as you can when drilling metal to preserve the sharp edges of the drill bit.
How to use the scribe:
A scribe is the best way to indicate straight lines to be sawn. Use a metal straightedge and the scribe and carefully pull the scribe along the edge to denote the line. Scribe the first pass gently and barely break the surface of the sheet. If you intend to fold along the scribed line, score the line with the scribe several times along the straight edge, cutting the metal deeper each time. A channel will be cut that will allow a clean, straight fold which can later be soldered for security if desired. You can also use the scribe to trace the perimeter of a stone on a bezel backing sheet, or to transfer a pattern to metal. Once you have finished using the scribe, protect the tips immediately with a cork, because once the tip is bent, the scribe will need to be sharpened and tempered again.
My 5 favorite tips for this tool duo:
• Indicate a sawing line with Sharpie first and then scribe it. If you wear off the marker, your pattern remains intact.
• A center punch can be used as a decorative metal stamp
• Use a center punch to flare out the shanks of tube rivets by slowly rotating it in the opening
• Use a scribe to draw on or texture metal sheet
• Use a scribe to indicate solder seams at the base of a bezel wall – solder will neatly flow around the track instead of onto the surrounding sheet.
Classes with Helen:
If you’d like to spend some one-on-one time with Helen and learn more about metalsmithing – you still have time to register to join her at JOGS in Tucson. Her classes will be offered January 30th and 31st. Click below to see what she will be teaching for our sister company JewelryTools.com.
Multi-Metal Cold Connected Bracelet
This is the bracelet that started a cold-connection renaissance, and you can learn to make it directly from the artist who created it! You will learn to texture metal, use a disc cutter, drill and punch holes with precision, and connect mixed metal circles with rubber O-Rings and micro hardware to create an unusual, adaptable bracelet or necklace.
Metal formed Botanical Pendant
Saw thin gauge metal and form it on a synclastic stake to quickly create these pretty botanical forms. You’ll be amazed at how fast these can be made and finished and you’ll have the option of forming a pendant or earrings with the option of creating several flower species. The ability to saw well will help you succeed.
Color on Metal
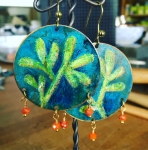
Learn how to add a splash of vibrant color to your jewelry metal! We’ll use colored pencils and pastels to create rich layered color on copper or brass. We will create an easy pair of earrings in class – or students have the option to create a simple riveted pendant if they are experienced at fabrication techniques like sawing and riveting. In addition to the coloring technique, instructor will demo Riveting, Sawing and delve into Color Use and Design. Don’t worry if you can’t draw – we have premade patterns to color, too!
I hope you’ve enjoyed and learned a little bit more about hand tools. Look for more great tips from Helen in the future.
Happy Wrapping!
![]()
Click to Receive Daily Tips by Email





0 comments