- NEW DVD Series – Stone Setting with Bezels
- Tube Set Charm by Kim St. Jean
- Prong Basket Pendant by Kim St. Jean
- NEW DVD Series – Stone Setting with Cold Connections
- New DVD Series – Stone Setting with Wire
- NEW DVD Series: Introduction to Stone Setting by Kim St. Jean
- Featured Tool: Bracelet Bending Plier
- NEW Dvd by Eva Sherman
- Fun, Fast Fold Forming DVD Series
- Double Band Ear Cuff from Alex Simkin
How to Make Balled Head Pins
by Judy Ellis, Wirejewelry.com
Wire Jewelry Tool Tip for November 11th, 2016
How to Make Balled Head Pins
by Judy Larson
If you use head pins in your jewelry making, you know that sometimes you can’t buy what you need. Well, today we have a fantastic tip about making your own balled head pins right in your studio.
Judy Says:
I use a small butane micro torch on 20 gauge and lighter wire to make balled head pins. I went through several of these torches before I discovered that my fuel was possibly “gumming” up the works as it was not super refined. I then started ordering 5x refined butane and am still using the same torch.
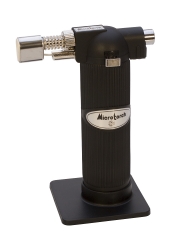
Product ID: SOL-300.00 – Our top-quality Micro-Flame butane torch is six inches tall, features electronic ignition (no lighter necessary), a maximum temperature of 2450 degrees F and a 90 minute burn. Easy-adjust feature assures the right flame for any job with precision accuracy.
When I ball the ends of 18 gauge or heavier wire, I use a larger torch. The larger flame makes it easier to ball the ends of the wire. I purchased a Eurotool Handy Flame torch head when they were first introduced because it fits on a Coleman butane fuel can, which fits comfortably in my hand. Also, the fuel was readily available at one of our local hardware stores.
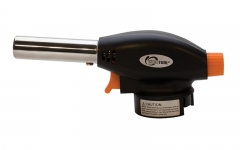
Product ID: SOL-315.00 – One-touch ignition multi-purpose butane torch head attaches directly to fuel canister so you can start working immediately. Adjustable flame control up to 2,375 degrees F. Lightweight, compact design attaches easily to a butane canister with a simple push and twist motion. Uses 8 ounce butane canister (not included).
Before using torches, I suggest that you view every Kate Richbourg video you can find on torch use and safety. She is an expert in the field and imparts a wealth of information.
I also suggest you watch videos on how different people make balled head pins. You will pick up many tips and may find some ways of doing things that work better for you than others.
TIPS:
You can never be too careful when working with fire. Always have a fire extinguisher handy and wear eye protection. Keep your hair tied back and do not wear loose clothing.
I do not have ventilation in my basement laundry room/studio so I make my headpins in my garage at my woodworking workbench. I open the garage doors and the back door for ventilation. I put my fire brick on a large metal bar pan, which sits on a fireproof surface on my workbench over the cement floor of my garage.
Since my garage is only warm enough to work in from very late Spring to early Fall, I make tons of headpins during that time so I will have them handy to use during the winter months here in northern Minnesota.
I use an easily replaceable cheap chain nose pliers to hold my wire. I always have a metal cup or deeper dish of water on my bar pan to immediately quench the balled wire.
What you see here is just a general overview of how headpins are made, along with a few tips and other information you may not find elsewhere.
ON TO THE MAKING OF A HEADPIN:
- Cut your wires about 1″ longer than you want the finished head pin to be. You will not need 1″ to ball up, but it is better to have too much wire than too little.
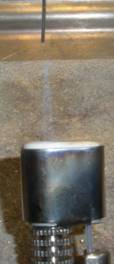
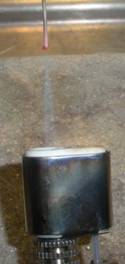
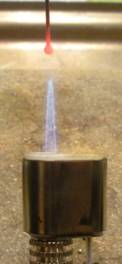
- Notice that the tip of the wire is positioned barely outside the tip of the blue flame. That is the hottest part of the flame so that is where you want your wire tip to be.
- You may think that the torch is directly under the wire, but it is not. I personally do not point the torch flame at the side of the wire tip. I prefer to come at it from a bit of an angle so the ball does not get blown or pushed by the force of the flame. NEVER use your torch directly under the wire.
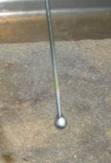
- If you use a slight angle on your flame, more of the wire will get heated, meaning that the ball can form more quickly. You can see this happening in the progression photos, where just the tip of the wire turns red, and then more of the wire becomes red hot. At this point, the ball starts to form.
- Immediately quench the balled wire.
An important thing to remember here is to not let the ball get too large or it will drop off the wire. If it cools too much before it hits the fire brick, it can bounce and hit you, burning a small hole in your clothes and/or burning you. Hint: You can see why it is a good to work on a fireproof surface, or one that you do not care about, and wear clothing you do not worry about too much.
You may find that the ball of your head pin droops to one side. An easy fix is to firmly grasp the headpin as close as you can to the ball with the tips of a flat nose pliers. Gently press the ball on a flat surface, moving the ball to a more centered position on the wire.
Types of Wire:
Argentium: Here you see a balled head pin made with Argentium wire. It makes a beautiful, smooth round ball. Fire scale does not form on Argentium so it remains silver. I tend to pickle everything, including Argentium, but it is not necessary. Argentium head pins will, however, have a more satin finish after you fire and cool them so you will probably want to tumble them in steel shot to bring back the shine and to work harden them.
Sterling Silver: When balling sterling silver wire, you may end up with a “dimple” or two on the ball surface, which is normal. Also, fire scale forms on the wire so it is necessary to pickle each piece. As with Argentium, you may want to tumble the head pins in steel shot to bring back the shine and to work harden them.
Copper: “Dimpling” is much more common on copper than on sterling silver balled head pins. As with sterling silver, you need to deal with fire scale. Tumbling in steel shot will bring back the shine.
Hint: Liver of sulfur patina will disguise the dimpling a bit on both sterling silver and copper.
If you love this tip and would like to read more of Judy’s contributions – CLICK HERE!
Happy Wrapping!
![]()
Click to Receive Daily Tips by Email







0 comments