- NEW DVD Series – Stone Setting with Bezels
- Tube Set Charm by Kim St. Jean
- Prong Basket Pendant by Kim St. Jean
- NEW DVD Series – Stone Setting with Cold Connections
- New DVD Series – Stone Setting with Wire
- NEW DVD Series: Introduction to Stone Setting by Kim St. Jean
- Featured Tool: Bracelet Bending Plier
- NEW Dvd by Eva Sherman
- Fun, Fast Fold Forming DVD Series
- Double Band Ear Cuff from Alex Simkin
How to Open and Close Jump Rings
by Judy Ellis, Wirejewelry.com
WireJewelry Tip for November 4th, 2015
How to Open and Close (Jump) Rings
by Marilyn Gardiner
We are fortunate to have Marilyn Gardiner as one of our contributors and today we share one of her simple tips -take a look!
To Open a Ring:
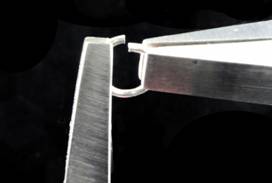
1. I use 2 pairs of pliers to hold the sides of a jump ring with the opening at the top (12 o’clock).
2. I prefer flat nose pliers because they provide more leverage, are easier on my wrist, and are less likely to mark the metal.
3. Notice that the pliers in my left (non-dominant) hand point to the ceiling and hold the left side of the ring steady. The pliers in my right (dominant) hand are parallel to the table top and turn that side of the ring towards me.
To Close a Ring:
1. I use 2 pairs of pliers to hold the sides of a jump ring with the opening at the top (12 o’clock).
2. I bring the ring ends back together by rotating the wrist of my dominant hand and exerting inward pressure. I often hear a “click” as the ends touch. My dominant hand does all the work—the other hand just holds on tight.
3. The goal is to have the two ends lined up exactly, with no space between them.
4. I move the ends back and forth by small amounts to adjust the fit. If I go a bit past where they are even, the ends will spring back and line up exactly.
5. Take the time to close each ring carefully—this is the mark of professional work.
6. Use a superfine emery board or metal file to remove rough spots from the seam where the cut ends meet. Rub with your fingertip to test.
Note: There are many ways to open and close rings successfully. As long as the rings are closed perfectly, with no marks, then how you got there is irrelevant! I’ve tried many strategies, and this is my method much of the time.
I hope you enjoyed this quick video tip from Marilyn! Check back for more great tips or articles from our new contributors!
Happy Wrapping!
![]()


Brenda Trudell
November 4, 2015 at 3:42 pm
This is how I have always closed them. However, no matter how I try there always seem to be marks. I have tried every tip or trick–masking tape, silicon dip, and others. I’ve been told I may holding my tools too tight, but if loosen my grip I am constantly dropping things. I do have osteoarthritis which could be a part of my problem but I won’t give in to that. Any suggestions? Thanks very much.
Judy Larson
March 2, 2016 at 8:06 am
I have arthritis as well. I use two Lindstrom flat nose pliers (Product ID: G2-7490RX). Because of their construction, I need to use less pressure to keep them closed. I know they are an investment, but the Lindstrom RX Ergonomic line of pliers have been a godsend to me. After getting used to them, everything became much easier to work on when I used them as opposed to my old pliers.