- NEW DVD Series – Stone Setting with Bezels
- Tube Set Charm by Kim St. Jean
- Prong Basket Pendant by Kim St. Jean
- NEW DVD Series – Stone Setting with Cold Connections
- New DVD Series – Stone Setting with Wire
- NEW DVD Series: Introduction to Stone Setting by Kim St. Jean
- Featured Tool: Bracelet Bending Plier
- NEW Dvd by Eva Sherman
- Fun, Fast Fold Forming DVD Series
- Double Band Ear Cuff from Alex Simkin
Making a Fancy “S” Clasp
by Judy Ellis, Wire-Sculpture.com
Wire Jewelry Tip June 27, 2014
Fancy “S” Clasp
Contributed by Mint Spring
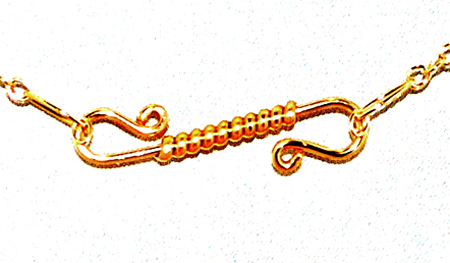
We have so many great FREE patterns available, that today I thought I’d share a quick tutorial by our good friend Mint Spring. She shows us how to wire wrap a Fancy “S” Clasp that can be used for just about anything. Enjoy!
Fancy “S” Clasp
Skill Level: Beginner/All
Technique: Components
It is so nice to be able to make about every part of your handcrafted jewelry piece, even the clasp. Be sure to check out the Design Variation at the bottom for an even more ornate design!
Materials
Tools
- Flat Nose Pliers or Chain Nose Pliers
- 6-step Rounds or Double Barrel Bail pliers
- Wire Cutters
Instructions
- Straighten measure and cut one piece of round wire: 2¼” for a small hook, 3″ for a long hook, or any length between the two. Use either round nose or chain nose pliers to make a very tiny loop at each end of the wire, in opposite directions.


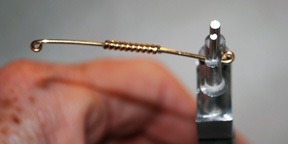
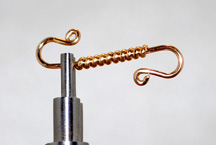
- Straighten, measure and cut one piece of half-round wire, 2″ long. Use round or chain nose pliers to make a small, angled loop at one end, leaving it just open enough to fit onto the round wire chosen. Use this half-round wire to wrap the center of the round wire, 6 to 10 times to show. Trim and file the ends smooth before placing them down, flat against the round wire.


- Use the middle step on 6-Step Round or the smaller barrel of Double Barrel Bail pliers to bend a curve into each end of the wire, immediately after and in the opposite direction of, each tiny looped end.


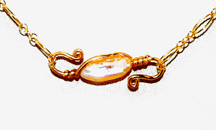
- Design Variation: In Step 1, make a tiny loop at just one end of the round wire and thread on a bead or a pearl. Make the second tiny loop at the opposite end, in the opposite direction from the first. In Step 2, when wrapping the half round wire, make 2 or 3 wraps before the bead/pearl, bring the half round down alongside the bead/pearl to its other end, and continue wrapping around the round wire, 2 or 3 times to show. Finish as in Step 3.
If you’d like to learn how to do more extensive wire work, take a look at our selection of Wire Jewelry Books and Instructional DVDS. We have many plenty choose from.
Happy Wrapping!
![]()
Do you love this information- why not sign up today for your FREE Jewelry Making Patterns. It’s a great place to start!
Click to Receive Daily Tips by Email





0 comments