- NEW DVD Series – Stone Setting with Bezels
- Tube Set Charm by Kim St. Jean
- Prong Basket Pendant by Kim St. Jean
- NEW DVD Series – Stone Setting with Cold Connections
- New DVD Series – Stone Setting with Wire
- NEW DVD Series: Introduction to Stone Setting by Kim St. Jean
- Featured Tool: Bracelet Bending Plier
- NEW Dvd by Eva Sherman
- Fun, Fast Fold Forming DVD Series
- Double Band Ear Cuff from Alex Simkin
Kate’s Top Ten Tips – Part 2
by Judy Ellis, Wire-Sculpture.com
January 15, 2014
Kate Richbourg’s Top Ten Tips for a Wiretastic New Year’s!
Part 2
Okay gang! Last week I shared FIVE of my top ten wire tips for a “Wiretastic” New Year’s. Don’t put down those pliers yet! To keep your momentum going, here are five more to keep you on the road to wire work in 2014.
1. Take a class and learn something new. Now as you may know, teaching is my passion. I love to share knowledge about all types of jewelry making techniques. Sometimes if you are having a creative challenge, it may be time to learn some new tips from an expert.
Did you know that Wire-Sculpture.com offers a metal working class on DVD for FREE? All you need to do is pay for shipping. Plus it features the fabulous Patti Bullard, wire and metalworking queen!
2. Hammer it out. Sometimes a wire design just looks better flattened a bit with a hammer and a little texture. I love this chasing hammer. I use the flat side to flatten and work harden my wire components and the ball side to add a little hammered texture. Remember to wield that hammer with a light touch. We are making jewelry here, not building a house!

Chasing Hammer with Wooden Handle, 1 1/8 Inch Face This chasing hammer has a 28mm (1-1/8″) face for striking chasing tools or flattening.
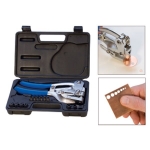
3. When in doubt, punch it out! Use the sheet metal hole punch plier to pop holes with ease through metal up to 18-gauge. Use pre-cut metal blanks, add some holes and wire wrap them together to create a quick linked earring or bracelet design. The large sized holes will accommodate a variety of heavy-gauge wire and your piece will have a bit more of an edgy look.
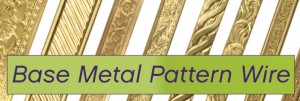
4. Patterned wire is AWESOME! Seriously, when I learned about this patterned wire all I could say was “Wow!” The designs are so interesting!
5. When in doubt, dap. Watch my video tutorial on how to use Dapping Tools:
Also, CLICK HERE for a quick tutorial on how to use your dapping skills to make your own beadcaps. Enjoy!
There you have it – Kate’s final five tips! If you’d like to re-read her first five tips – Click Here!
Click to Receive Daily Tips by Email


0 comments